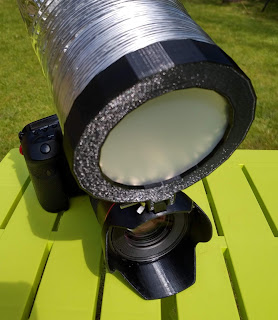
The abundance of insects over the last couple of months has been a perfect opportunity to experiment with different macro flash setups. Using a standard speedlight as-is isn't really an option, as the light is projected out much further than the front of the lens (which is exactly what you'd normally want a speedlight to do) and is much too harsh. There are therefore two problems that need to be solved; diffusing the light and directing it closer to the front of the lens.
There are of course multiple commercial solutions available, such as the Canon MT24-EX or the Sigma EM-140 ring flash, but these are all relatively expensive and unlikely to be an option to anyone wanting to experiment with macro photography. A speedlight however is much less of a barrier to entry.
A few different prototypes were made but the design I settled on was a light pipe style design that captures the flash light and funnels it down to the front of the flash. Of course, it would be ideal to have the light come from the same plane as the lens, but that is the compromise of this approach. As it turns out, the light angle is good enough to illuminate the subject without casting obvious shadows.
The photos below show the final 3d printed rig. The silver pipe is an aluminium ventilation duct pipe, the kind used on tumble dryers. The 100mm pipe diameter fits over the flash unit very nicely. The two part design of the hood section means the light can be angled depending on the distance to the subject.
The actual diffuser material was cut from the cover of this cheap notebook.
Here are a few shots taken with this setup.
If you own a Canon 100mm macro, have access to a 3d printer and would like to try this rig for yourself, the plans can be found here.


Comments
Post a Comment